


Under-Cabinet LED Strips: Complete Installation Guide & ROI Analysis
Table Of Contents
- Introduction
- Benefits of Under-Cabinet LED Lighting
- Types of Under-Cabinet LED Strips
- Planning Your Installation
- Step-by-Step Installation Guide
- Return on Investment Analysis
- Maintenance and Troubleshooting
- Styling Tips and Design Considerations
- Conclusion
Under-Cabinet LED Strips: Complete Installation Guide & ROI Analysis
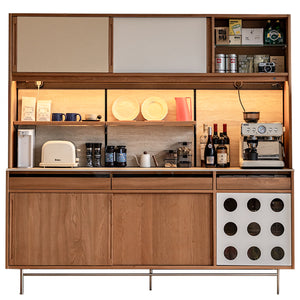
Transforming your kitchen from ordinary to extraordinary often hinges on thoughtful lighting choices. Under-cabinet LED strips have emerged as one of the most impactful and cost-effective upgrades homeowners can make. These versatile light sources not only enhance your kitchen's functionality by illuminating countertops for food preparation and cooking but also create an inviting ambiance that can completely transform your space.
Whether you're renovating your kitchen, building a new home, or simply looking for ways to enhance your current living space, under-cabinet LED lighting offers an impressive blend of practicality and aesthetic appeal. At Loft Home Furniture, we've seen firsthand how strategic lighting can complement our carefully curated furniture collections to create cohesive, designer-inspired interiors without breaking the bank.
In this comprehensive guide, we'll walk you through everything you need to know about under-cabinet LED strips—from selecting the right type for your needs and budget to installation techniques and maintenance tips. Most importantly, we'll analyze the return on investment so you can make an informed decision about this popular home improvement project.
Under-Cabinet LED Installation Guide
Transform your kitchen with this cost-effective upgrade
Key Benefits
- Enhanced Functionality: Eliminates countertop shadows for safer food prep
- Energy Efficient: Uses 75% less energy than traditional lighting
- Aesthetic Appeal: Creates depth and highlights backsplashes
- Space Enhancement: Makes kitchens appear larger and more open
Installation Steps
- Measure cabinet lengths and add 10% for corners
- Select appropriate LED strips and power supply (12V or 24V)
- Clean undersides of cabinets with alcohol
- Position strips 1-2 inches from cabinet front edge
- Connect strips to power supply following +/- markings
Return on Investment
Typical Material Cost
Cost Recovery in Home Value
Energy Savings Over 10 Years
Design & Maintenance Tips
Styling Tips
- Use 4000-5000K lighting for contemporary kitchens
- Warmer 2700-3000K tones for rustic styles
- Combine with overhead and accent lighting for depth
Maintenance
- Clean every 6-12 months with a soft, damp cloth
- Check connections if flickering occurs
- Replace power supplies every 5-8 years
Transform your kitchen with this practical, aesthetic upgrade that offers excellent return on investment.
Benefits of Under-Cabinet LED Lighting
Under-cabinet LED lighting delivers multiple advantages that extend far beyond basic illumination. Understanding these benefits will help you appreciate why this upgrade has become increasingly popular in modern homes.
Enhanced Functionality and Task Lighting
The primary function of under-cabinet lighting is to eliminate shadows on countertops, making food preparation safer and more efficient. Unlike overhead lighting which can cast shadows when you stand at the counter, under-cabinet LEDs provide direct illumination exactly where you need it. This targeted light source reduces eye strain and makes detailed tasks like chopping vegetables or reading recipes significantly easier.
Energy Efficiency
Modern LED strip lights consume up to 75% less energy than traditional incandescent bulbs while lasting 25 times longer. A typical LED strip uses between 4 and 8 watts per meter, making them an environmentally friendly choice that also reduces your electricity bills. Their lower heat emission also means they're safer to operate in enclosed spaces like cabinets.
Aesthetic Appeal and Ambiance
Beyond practical benefits, under-cabinet lighting adds a layer of sophistication to your kitchen design. The soft illumination creates depth and dimension, highlighting backsplashes and countertop materials. Many modern LED strips offer customizable color temperatures, allowing you to switch between cool white light for task-oriented activities and warmer tones for entertaining or evening ambiance. This flexibility helps integrate your kitchen lighting with your overall living room and dining room design scheme.
Space Enhancement
Strategically placed lighting makes spaces appear larger and more open. Under-cabinet LEDs draw the eye outward, creating an illusion of expanded space that's particularly valuable in smaller kitchens. This visual trick complements space-saving furniture solutions like our extendable tables and storage sofas that maximize functionality in compact living areas.
Types of Under-Cabinet LED Strips
Before purchasing under-cabinet lighting, it's important to understand the different options available and which might best suit your needs and home design.
Flexible LED Strip Lights
Flexible LED strips are the most popular option for under-cabinet lighting. These thin, adhesive-backed strips contain multiple small LEDs and can be cut to custom lengths at marked intervals. Their flexibility makes them ideal for navigating corners or fitting unusual cabinet layouts. Available in various brightness levels (measured in lumens) and color temperatures, flexible strips provide excellent versatility for most kitchen installations.
Rigid LED Light Bars
For homeowners seeking a more structured look, rigid LED light bars provide a sturdier alternative. These pre-made fixtures typically come in fixed lengths and offer more concentrated light output. Light bars often include diffusers that minimize the individual LED light points, creating a smoother, more consistent illumination that complements the clean lines of contemporary storage solutions.
Puck Lights vs. Strip Lights
While this guide focuses on strip lighting, it's worth noting the difference between puck lights and strip lights. Puck lights are individual round fixtures that create pools of light rather than continuous illumination. They work well for highlighting specific areas but require multiple units for complete coverage. Strip lights provide more uniform illumination across the entire countertop and typically offer better value for comprehensive installations.
Smart LED Options
The newest generation of LED strips includes smart options that integrate with home automation systems. These programmable lights can be controlled via smartphone apps or voice assistants, allowing you to adjust brightness, color temperature, and even create custom lighting scenes. While slightly more expensive, smart LED systems offer convenience and enhanced functionality that aligns perfectly with modern, tech-forward home designs.
Planning Your Installation
Proper planning is essential for a successful under-cabinet lighting installation. Taking time to measure accurately and consider power requirements will save you headaches during the installation process.
Measuring for Materials
Begin by measuring the length of all cabinets where you plan to install lighting. For the most cohesive look, plan to run lights along the entire length of your cabinets rather than installing disconnected sections. Add approximately 10% to your total measurement to account for corners and potential mistakes. If using flexible LED strips, check the cutting intervals (typically marked every 2-4 inches) and plan your cuts to minimize waste.
Power Supply Considerations
LED strips require a transformer (also called a driver) that converts standard household voltage to the low-voltage DC power needed for LEDs. Calculate your power requirements by multiplying the wattage per meter of your chosen LED strips by the total length in meters. Select a power supply that exceeds this number by at least 20% to prevent overloading. Most residential installations use 12V or 24V systems, with 24V systems generally providing more stable performance over longer runs.
Wiring Routes and Switch Placement
Determine how you'll connect your LED strips to power and where switches or controls will be located. Options include:
- Hardwired installations that connect to your kitchen's electrical system (typically requiring an electrician)
- Plug-in systems that use existing outlets
- Battery-powered options for areas without convenient access to power
Consider hiding power supplies inside or above cabinets for a cleaner look. For switch placement, under-cabinet motion sensors, remote controls, or wall-mounted switches near the kitchen entrance typically offer the most convenience.
Step-by-Step Installation Guide
Installing under-cabinet LED strips can be a straightforward DIY project for those comfortable with basic electrical work. If you're uncertain, consider consulting a professional electrician, especially for hardwired installations.
Preparation and Safety
Before beginning installation, gather all necessary tools: measuring tape, scissors or utility knife (for cutting LED strips), electrical tape, wire connectors, a screwdriver, and possibly a drill. If your installation involves connecting to household wiring, always turn off the circuit breaker before beginning work. Clean the undersides of your cabinets thoroughly with alcohol to ensure good adhesion of the LED strips.
Positioning for Optimal Light Distribution
The placement of your LED strips significantly affects their performance. For the best task lighting without visible glare, position strips toward the front edge of the cabinet, approximately 1-2 inches from the front. This placement directs light onto the countertop rather than the backsplash. If your cabinets have a lip or trim piece along the bottom edge, installing the strips behind this lip helps conceal the lights from direct view while standing.
Installation Process
Follow these steps for a typical installation with flexible LED strips:
- Measure and cut your LED strips to the appropriate length at the designated cutting points.
- Test all strips before installation by temporarily connecting them to the power supply.
- Remove the backing from the adhesive strip and carefully apply to the clean cabinet surface, working slowly to avoid air bubbles.
- Connect multiple strips using connectors or by soldering according to the manufacturer's guidelines.
- Mount the power supply in a concealed location with adequate ventilation.
- Connect the LED strips to the power supply following the positive (+) and negative (-) markings.
- Install any switches, dimmers, or controllers according to their instructions.
- For plug-in systems, route the wires neatly and secure with cable clips.
- Test the complete system before considering the installation complete.
Professional vs. DIY Installation
While many homeowners successfully install under-cabinet lighting themselves, professional installation offers several advantages. Professionals can seamlessly integrate the lighting with your home's electrical system, conceal wiring inside walls, and ensure compliance with local building codes. For complex kitchens or installations involving multiple circuits, professional installation typically costs between $200-$500 beyond material costs but provides peace of mind and often includes warranty coverage on the work performed.
Return on Investment Analysis
Understanding the financial implications of installing under-cabinet LED lighting helps justify this home improvement project beyond its immediate aesthetic benefits.
Cost Breakdown
The total cost for under-cabinet LED lighting depends on several factors:
Materials: Basic LED strip kits range from $30-$100 for a standard kitchen, while premium or smart systems can cost $150-$300. Additional components like quality dimmers, controllers, or custom connectors may add $50-$150 to your project.
Installation: DIY installation eliminates labor costs, requiring only the price of materials. Professional installation typically adds $200-$500 depending on complexity and your location.
Operating costs: LED strips use minimal electricity—approximately $3-$5 annually for typical kitchen usage—making them extremely economical to operate compared to other lighting solutions.
Home Value Enhancement
Under-cabinet lighting delivers an impressive return on investment through home value appreciation. Real estate experts estimate that thoughtfully installed kitchen lighting can help recover 80-90% of its cost through increased home value. A $300 investment in quality under-cabinet lighting could potentially add $240-$270 to your home's market value while simultaneously making your property more attractive to prospective buyers.
Beyond direct financial returns, under-cabinet lighting contributes to the overall impression of a well-maintained, modern home. When paired with quality furniture pieces like those from our cabinet and dining room collections, these lighting upgrades help create the cohesive, designer-inspired aesthetic that today's homebuyers actively seek.
Energy Savings
The energy efficiency of LED lighting contributes significantly to its positive ROI. Compared to halogen under-cabinet lighting, LEDs use approximately 75% less energy while lasting 15-25 times longer. Over a 10-year period, this efficiency can translate to $150-$250 in direct energy savings for a typical kitchen installation.
Additionally, LEDs generate less heat than traditional lighting, potentially reducing cooling costs during summer months. This combination of lower energy consumption and reduced cooling needs makes LED under-cabinet lighting an environmentally responsible choice that pays dividends through lower utility bills.
Maintenance and Troubleshooting
One of the significant advantages of LED lighting is its minimal maintenance requirements. However, knowing how to address common issues will help ensure your under-cabinet lighting continues performing optimally for years to come.
Cleaning and Care
To maintain optimal brightness, gently clean your LED strips every 6-12 months using a soft, slightly damp cloth. Ensure the power is turned off before cleaning. Avoid liquid cleaners or sprays that could damage electrical components. For persistent kitchen grease buildup on the strips or diffusers, a mild solution of water and dish soap applied with a barely damp cloth works effectively without risking electrical components.
Common Issues and Solutions
Despite their reliability, LED strips occasionally develop problems. Here are solutions for common issues:
Partial lighting or flickering: Often caused by loose connections between strips or at the power supply. Check and secure all connection points. If flickering persists, your power supply may be underpowered for the load.
Dimming over time: Gradual brightness reduction might indicate dust accumulation or LED degradation. Clean thoroughly and check if brightness improves. Significant dimming after years of use may simply indicate it's time to replace the strips.
Color inconsistency: Variations in color temperature between strips usually indicate mismatched products. Ensure all replacement strips match the original color temperature (measured in Kelvins).
When to Replace Components
Quality LED strips typically last 25,000-50,000 hours (approximately 15-25 years of regular kitchen use). However, power supplies and controllers often have shorter lifespans of 5-8 years. If your lights function erratically despite checking connections, consider replacing the power supply first before investing in new LED strips. This preventive approach often resolves issues at minimal cost while extending the life of your lighting system.
Styling Tips and Design Considerations
Maximizing the impact of your under-cabinet lighting involves thoughtful integration with your overall kitchen design and furniture selections.
Coordinating with Kitchen Aesthetics
Different interior design styles benefit from specific lighting approaches. For contemporary and minimalist kitchens, clean, bright white lighting (4000-5000K) enhances the crisp lines and reflective surfaces. In contrast, rustic or vintage-inspired kitchens benefit from warmer tones (2700-3000K) that complement wood grains and create a cozy atmosphere.
Consider how your lighting interacts with cabinet finishes and countertop materials. Light-colored surfaces reflect more light, amplifying brightness, while darker finishes absorb light and may require higher-intensity LED strips for equivalent illumination.
Creating Layered Lighting
Under-cabinet lighting works best as part of a comprehensive lighting strategy. Combine it with overhead lighting (ambient) and pendant lights (accent) to create depth and eliminate shadows throughout the kitchen. This layered approach allows you to adjust lighting based on activities—bright, full-spectrum lighting for meal preparation and cooking, transitioning to softer, warmer light for dining and entertaining.
Consider extending your under-cabinet lighting concept to other areas of your home. Similar installations work beautifully in bathrooms beneath storages with mirrors, in living rooms beneath floating shelves, or in bedrooms as subtle reading lights mounted under shelf storage units.
Smart Home Integration
For the ultimate convenience and customization, consider integrating your under-cabinet lighting with your home automation system. Smart lighting allows you to create preset scenes for different activities, schedule lighting changes throughout the day, or control your lights remotely. Many systems can be voice-controlled through popular assistants like Google Home, Amazon Alexa, or Apple HomeKit.
While smart lighting represents an additional investment, the enhanced functionality and convenience it provides make it worth considering, particularly if you're already incorporating other smart home features into your living space.
Conclusion
Under-cabinet LED lighting represents one of the most accessible and impactful upgrades you can make to your kitchen. With relatively modest investment, this addition enhances both the functionality and aesthetic appeal of your space while providing impressive returns through energy savings and home value appreciation.
The versatility of modern LED technology means there's a solution for every kitchen design and budget. Whether you're undertaking a complete kitchen renovation or simply looking for a weekend project to refresh your space, under-cabinet lighting delivers exceptional value. The combination of improved task lighting, ambient glow, and design enhancement makes this upgrade particularly compelling for homeowners who appreciate the perfect balance of form and function.
As with any home improvement project, quality materials and careful installation make all the difference in the final result. By following the guidelines in this article and selecting components that complement your kitchen's design, you'll create lighting that not only illuminates your countertops but elevates your entire living space.
Visit Loft Home Furniture to discover our complete collection of designer-inspired furniture and home accessories that perfectly complement your newly upgraded kitchen lighting. Our expert team can help you select pieces that enhance your home's functionality while creating the stylish, cohesive aesthetic you desire—all at honest, accessible prices.


Leave a comment